
Do I Need a Graphic Designer to Order Custom Shirts?
No — you don't need to hire a graphic designer to order custom shirts, and most of the orders we print never involve one. Here are the three honest routes: build it yourself free in the online studio, send whatever file you already have and let our designers prep it, or hire someone (and the three cases where that's genuinely worth it). Plus the five self-design mistakes we correct most often.
- Do you need one
- No. Most of the orders we print never involve a hired designer — the customer either builds it in our free studio or sends the file they already have.
- Design it yourself
- Free online studio at yayaprints.ca/mockup-creator — no account, no deposit, real garments and colours, and the price updates as you go.
- Artwork check
- A human designer reviews every order before it goes to press: resolution, colour, sizing against the real print zone, and placement. It is not an automated preflight.
- What that check costs
- Nothing. Cleaning up a file, resizing it, fixing placement and redrawing it as vector art are all included with the free mockup.
- Files we accept
- A phone screenshot, a PNG pulled off your website, a PDF, or an AI-generated image. We fix it or redraw it and show you the result before you pay.
- What is a separate job
- Inventing an original logo from scratch. That is a paid design service at yayaprints.ca/logo-design, not part of a print order.
- Turnaround
- 2–5 business days in production after you approve the mockup and pay, plus shipping if you are outside Ottawa–Gatineau. Rush is available on most apparel jobs.
The honest answer: no, and here is why not
This question comes in most weeks, usually phrased as an apology. "I don't have a designer, is that a problem?" It is not a problem. The overwhelming majority of the shirts, hoodies and uniforms that leave our shop were never touched by a hired graphic designer. Somebody uploaded a logo, or typed a team name, or emailed a photo of a business card, and the order printed beautifully.
The reason is structural. Shirt printing is not graphic design — it is reproduction. A print job needs artwork at the right resolution, at the right physical size, in colours that will hold against the fabric, positioned inside a printable zone that has a fixed shape. Those are technical requirements with correct answers, and they get handled on our side whether or not you hired anyone. What a designer adds is invention: an idea that did not exist before. That is a different purchase, and most orders do not need it.
So the useful question is not "do I need a designer" but "which of the three routes fits this particular job." The rest of this guide walks all three honestly, including the cases where paying a designer is clearly the right call and we will say so. If you already know you want to try it yourself, the fastest thing you can do is open the free design studio and start pushing a logo around a real shirt. Nothing is charged and nothing is committed.
The three routes, side by side
These are not tiers of quality. They are three different starting points, and a good print comes out the end of all three. The difference is who does the inventing and how much of your own time goes in.
| Route | What you supply | Your time | Design cost | Best for |
|---|---|---|---|---|
| Do it yourself in the studio | A logo, a photo, or just words | 10–20 minutes | Free | Team shirts, events, staff tees, one-offs, anything text-led |
| Send us what you have | Any file — screenshot, PNG, PDF | One email | Free file prep with your quote | Existing logos, reorders, uniforms, anyone short on time |
| Hire a designer | A brief and a budget | Days to weeks | A separate paid job | New brand identity, complex illustration, a full uniform program |
You can also mix them, and plenty of people do. A café owner hires someone once to draw the logo, then uses the studio forever after to put that logo on new tees, hoodies and aprons without paying design fees again. That is the pattern we see most often, and it is the sensible one.
Route one: design it yourself in the free studio
The online design studio is free, needs no account and takes no deposit. You pick the garment, set its colour, upload a logo or type text in print-quality fonts, drag it into place on the actual product, enter your sizes, and watch the per-piece price move as you change the quantity. When you are happy you order straight from the page.
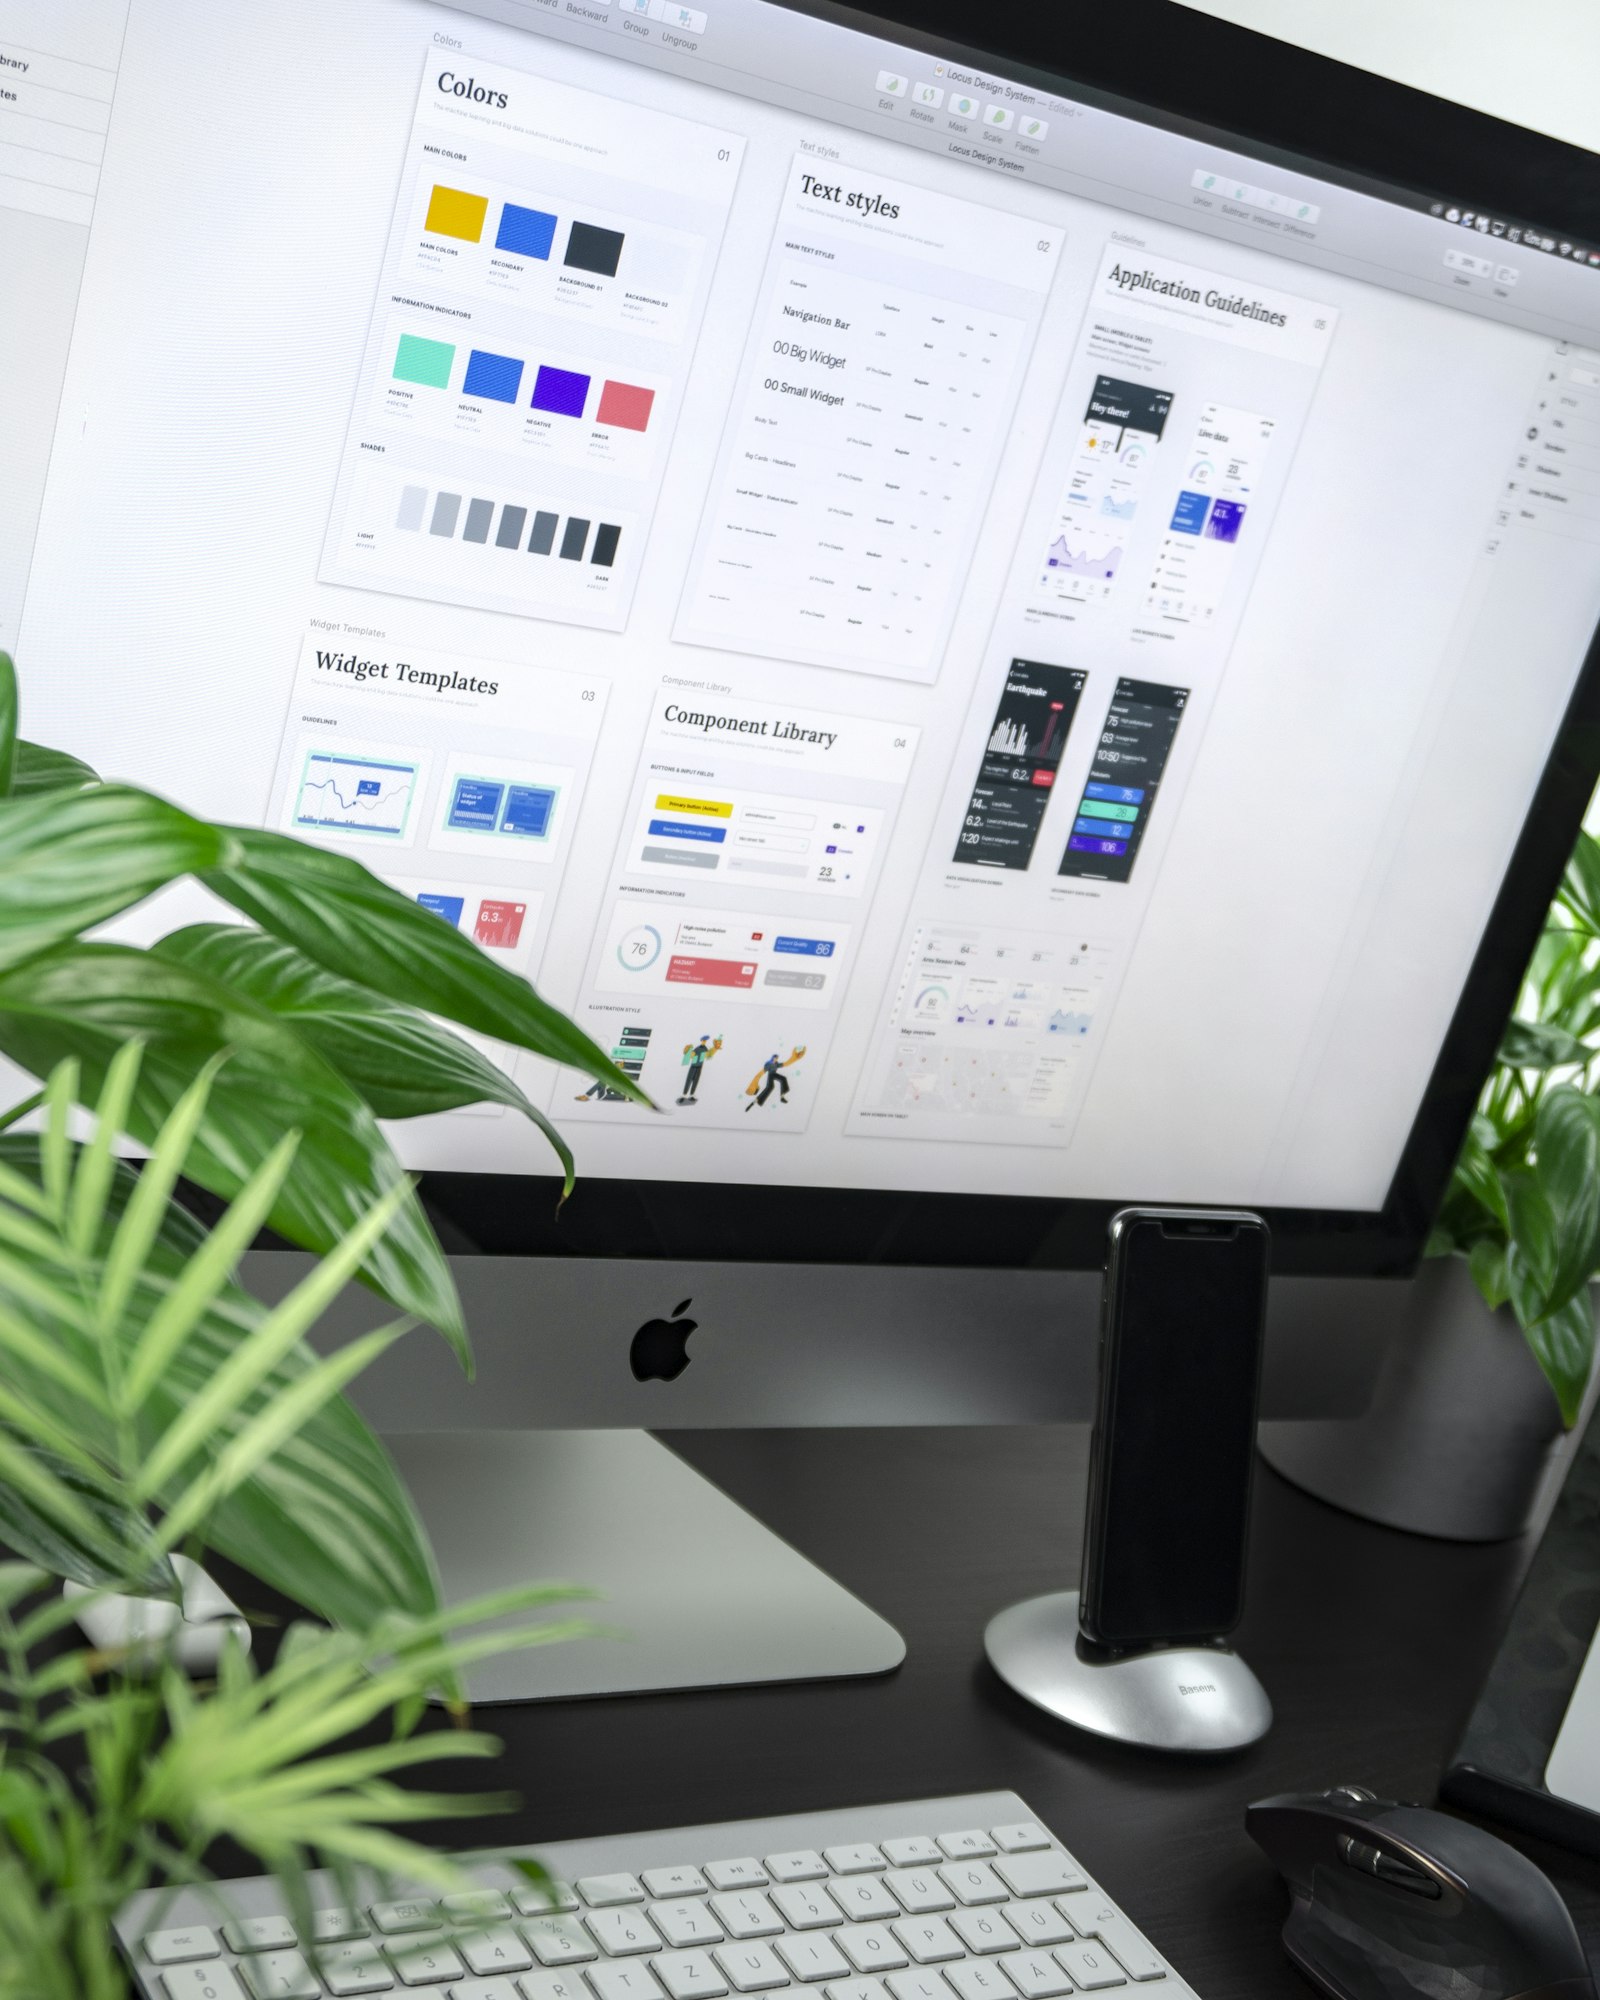
The reason this works for people with no design background is that the hard decisions are constrained for you. The printable area is drawn on the garment for you, so you are not guessing where it ends. You cannot invent a garment colour that does not exist. The price is not a mystery you have to email about. What is left is the part you are actually qualified to judge — whether it looks like your team, your business, your event.
The self-serve route in order:
- Pick the garment and colour first. A design that reads on white can vanish on navy. Find that out before you place anything.
- Upload the file you already have.Do not go hunting for a perfect vector first — upload it and let the review step tell you if it is good enough.
- Turn on the print-zone guide. It draws the real printable area. Place art inside it rather than eyeballing the middle of the shirt.
- Size it against something real. A left-chest logo is usually about 3 to 4 inches wide; a full front is about 10 to 12. Our chest logo size guide has the numbers.
- Set text in the built-in fonts. Typed text prints crisp at any size. A screenshot of text does not.
- Enter sizes and check the price. Test 12 against 50 against 100 before you commit to a quantity.
- Submit it for the human check. Somebody looks at it before it is printed. That is the safety net that makes doing it yourself safe.
There is a longer walkthrough with screenshots in designing your own shirt online in Canada, and if you want to think about the design itself rather than the tool, how to design a custom t-shirt covers composition, colour count and what actually reads from across a room. For hoodies specifically, placement rules differ enough that the hoodie print placement guide is worth five minutes — pockets and hood seams eat into the printable area in ways a flat tee does not.
Route two: send whatever file you have and let our designers fix it
If you do not want to open a design tool at all, do not. Email the file to order@yayaprints.ca or start a free quote and attach it. We are not fussy about what arrives. A photo of a business card taken on a phone, a logo pulled off your own website, a PDF from whoever built your signage, a screenshot from a group chat, an image a customer generated with an AI tool — all of it is workable material, and all of it comes back to you as a mockup on the actual garment before you pay anything.
This is the part worth being specific about, because it is usually described vaguely. Every order is reviewed by a human designer before it goes to press.Not an automated preflight that flags a warning and prints anyway — a person on the team who opens your file, looks at it at print size, and either fixes it or tells you exactly what is wrong with it. That review is why sending an imperfect file is a perfectly reasonable plan. It is also why an image out of an AI tool is not a dead end — there is a whole piece on printing an AI-generated logo on a shirt if that is where your art came from.
The artwork prep is part of building your mockup, not a separate stage bolted on afterwards, so it does not add its own queue to the schedule. Production is 2–5 business daysfrom the moment you approve the mockup and pay, and rush is available on most apparel jobs. What actually slows orders down is the wait for someone to reply and say yes. If your file is genuinely unusable — 50 pixels wide, or a photo of a screen with moiré bands through it — you will hear that from us before you spend money, not after.
What we fix for free, and what is a separate paid job
The line is clean, and it is worth stating plainly because people assume the free part is smaller than it is.
Included with every quote and mockup, at no charge:
- Resolution check. We look at your file at the physical size it will print, not at thumbnail size. A logo that looks fine in an email signature is often soft at 11 inches across a chest.
- Colour. Screen colours and ink are not the same thing. We flag colours that will shift, and we deal with the classic problem of art built on a white background being ordered on a black garment. There is more on this in CMYK versus RGB for printing.
- Sizing against the real print zone.Not against a generic rectangle — against the actual printable area of the garment you ordered, which changes between a youth tee, an adult hoodie and a polo.
- Placement. Measured from the collar and the centre line, not judged by eye. This is the single most common thing we adjust.
- Background removal and cleanup. Stripping the white box off a JPG, knocking out compression fuzz, straightening a crooked scan.
- Vector redraw where it is needed. If the art has to be rebuilt as clean vector artwork so it prints sharp, we redraw it. That is what the PNG versus vector distinction is really about.
What is a separate paid job:designing something that does not exist yet. If you need an original logo invented — concepts, typefaces, a mark you will put on a sign and a van and a business card for the next ten years — that is real design work with real hours in it, and it is not bundled into the price of a shirt. We do offer it as its own service at our logo design page, priced separately, and nothing produced there reaches you without a person approving it first. Custom illustration, hand-lettering and full brand systems fall on the same side of the line.
The distinction in one sentence: preparing your artwork is free, inventing artwork is not. Almost everyone who asks whether they need a designer only needs the first thing.
When hiring a designer genuinely is worth the money
We would rather be useful than close every sale, so here are the cases where we would tell you to go pay someone.
A brand identity you will use for years.If this logo is going on the shirts, then the van, then the storefront sign, then the invoices, the shirt order is the smallest thing riding on it. Getting a mark drawn properly once — in vector, with the spacing and the colour values fixed — pays for itself the fourth time you use it. A design you build in twenty minutes for an event is a perfectly good design for that event. It is a poor foundation for a clothing brand or a company you intend to grow.
Complex multi-colour illustration.Detailed artwork, character illustration, intricate line work, anything that has to be drawn rather than arranged. A design tool lets you place and scale art. It does not draw a mascot. If the idea in your head is a picture rather than a layout, you need someone who can draw it, and then we print it — full-colour illustration is exactly what DTF printing handles without adding cost per colour.
A full uniform program.When the same identity has to work at a left-chest embroidery size on a polo, across the back of a hi-vis jacket, on a cap, and on a hat you cannot fit fine detail onto, one file rarely serves all of them. A designer builds the variants — a simplified stitch-friendly mark for embroidery, a one-colour version for cheap screen printing at volume, a horizontal lockup for a back print. If you are outfitting a crew across multiple garment types, that groundwork is worth paying for once.
Outside those three, the honest answer stays no. A staff tee, a fundraiser, a bachelor party, a school team, a shop with an existing logo — none of those need a designer hired for them.
Five mistakes people make designing their own shirt
These are the five we correct most often. Not one of them requires design training to avoid, which is rather the point — they are measurement problems, not taste problems.
1. The logo is too small. By a mile, the most common one. On a screen a logo fills the browser window, so people size by feel and end up with a 2-inch mark floating on a 20-inch chest. A left-chest print is normally 3 to 4 inches wide and a full front 10 to 12. Type the number in rather than dragging until it looks right.
2. The art is centred by eye instead of measured.A shirt is not symmetrical the way a rectangle is. The visual centre sits below the geometric centre, and the collar cuts into the top of the print area. Placement should be measured down from the collar seam and across from the centre line — which the studio's print-zone guide does for you, and which our designers re-check on every order regardless of how you sent it.
3. No contrast against a dark garment. Navy text on a black hoodie is invisible from three feet away. Art designed on a white canvas often has white elements you never noticed, or a white background box that becomes a white rectangle on the garment. Set the garment colour before you design, not after.
4. The text is too small to survive printing. Thin strokes and small type do not reproduce the way they do on paper. Fabric has a texture, ink spreads slightly, and embroidery has a hard floor below which letters turn into a blob. If a line of text matters, make it bigger than feels necessary. If it does not matter, cut it.
5. The art ignores the seam. Side seams, shoulder seams, hood seams, zips and pockets are all obstacles a press cannot flatten. A design that crosses one will come out distorted or broken. Hoodies are the worst offenders because the pouch pocket sits right where people want a big front print. Keep the art inside the flat area, or move it to a placement that has one.
All five are caught before printing anyway — that is what the review is for — but catching them yourself saves a round trip. Build it in the studio with the print-zone guide switched on and four of the five stop being possible.
How to decide in about two minutes
Ask yourself one question: does the artwork already exist?
If yes — you have a logo, a photo, a wordmark, anything — you do not need a designer. Send it to us or drop it into the studio. Our team handles resolution, colour, sizing and placement for free, and you see a mockup on the real garment before you pay.
If no, but what you want is words, a shape and a colour — a team name, a date, an event, a slogan — you still do not need a designer. Build it yourself in the studio with the built-in print fonts. Text-led shirts are the single easiest thing to make well without training, and they are a large share of what we print.
If no, and what you want is a picture that has to be drawn, or a mark you will still be using in five years — hire someone, or use our logo design service. Then bring the finished file back and we will put it on shirts.
Everything we print is made in-house in Ottawa and shipped Canada-wide, including Toronto and the GTA, so the person checking your artwork and the person running the press are in the same building. There is no minimum on DTF or DTG — we will print one shirt to see how the design lands before you commit to fifty. If you would rather talk it through than click through it, the number is 613-666-9292 and someone answers.
Frequently asked questions
Do I need a graphic designer to order custom shirts?
No. Most orders we print never involve a hired designer. You can build the design yourself in our free online studio at yayaprints.ca/mockup-creator, or send us whatever file you already have and we prepare it for print. Either way a human designer on our team reviews the artwork before it goes to press — resolution, colour, sizing against the real print zone, and placement — and you approve a free mockup on the actual garment before you pay anything.
Is the online t-shirt design tool really free?
Yes. The studio at yayaprints.ca/mockup-creator costs nothing, needs no account and takes no deposit. You pick a garment and colour, upload a logo or set text in print-quality fonts, place it on the real product with a print-zone guide, enter your sizes and watch the per-piece price update live. You only pay if you decide to order, and only after you have approved the mockup.
What does your designer fix for free, and what costs extra?
Preparing your artwork is free: resolution checks at print size, colour adjustments, sizing against the actual print zone for your garment, measured placement, background removal, and redrawing the art as clean vector where that is what it needs. What costs extra is inventing artwork that does not exist yet — an original logo, custom illustration or a full brand identity. That is a separate service at yayaprints.ca/logo-design, priced on its own.
Can I send a phone screenshot or a low-resolution logo?
Yes, send it. A photo of a business card, a PNG pulled off your website, a PDF from your sign company or an AI-generated image are all workable starting points. A person looks at the file at the size it will actually print, cleans it up or redraws it as vector art, and shows you the result on a mockup before you spend anything. If a file genuinely cannot be saved we tell you that up front rather than printing it anyway.
When is it actually worth hiring a designer for custom shirts?
Three cases. First, a brand identity you will use for years across shirts, signs, vehicles and print — get the mark drawn properly once. Second, complex multi-colour illustration, because a design tool arranges art but does not draw a mascot. Third, a full uniform program, where the same identity has to work at embroidery size on a cap, in one colour for cheap screen printing, and across the back of a jacket. Outside those, you almost certainly do not need one.
What are the most common mistakes when people design their own shirt?
Five: sizing the logo too small (a left-chest print is normally 3 to 4 inches wide and a full front 10 to 12), centring the art by eye instead of measuring from the collar and centre line, designing on white and then ordering a dark garment so nothing has contrast, using text too thin or small to survive fabric and ink spread, and running art across a seam, zip or hoodie pocket that a press cannot flatten. Our review catches all five, but avoiding them saves a round trip.
How long does the artwork review add to my order?
It happens as part of preparing your free mockup rather than as a separate stage you wait through, so it does not add its own queue. Production is 2 to 5 business days from the moment you approve the mockup and pay — not from when you first got in touch. Rush is available on most apparel jobs. Add shipping transit on top if you are outside the Ottawa–Gatineau area; the GTA and Greater Montreal typically see 1 to 2 days once the order leaves the shop.
Can I design it myself and still have someone check it?
That is exactly how the studio is meant to be used. You do the creative part — garment, colour, layout, wording — and the technical part is checked by a real person before anything is printed. It is not an automated preflight that flags a warning and prints regardless. If your placement is off or your file is too low-resolution for the size you chose, a designer fixes it or tells you plainly what is wrong, and you see the corrected version on the mockup first.
Design it yourself. A human designer still checks every order.
Our free studio gives you the price and the mockup in the browser. What it doesn't do is print your file blindly — every order is reviewed by a real designer before it reaches the press.
- Step 1You design it — free
Upload your logo, drop it on a real garment, set the size and placement, pick colours and quantities. No account, no deposit, no waiting on a reply.
- Step 2A human designer checks it
Before anything prints, one of our designers opens your file and checks resolution, colours, sizing and placement. If it won't print well, we fix it or tell you exactly what's wrong — a person, not an automated preflight.
- Step 3You approve, then we print
You get the corrected mockup back on the actual product. Nothing goes to press until you say yes — then it's ready in 1–2 weeks, or in 1–3 business days with a rush.
You already have everything you need to design this
Open the free studio, drop your logo on a real shirt, set the size and colours, and see the price as you go. No account, no deposit, no design fee — and a human designer checks the artwork before anything is printed.
Every order is reviewed by a human designer before it goes to press. A person checks artwork resolution, colour, sizing and placement, and either fixes the file or tells the customer what is wrong — it is not an automated preflight.